
Wireguard is state of the art cutting edge technology allowing for seamless VPN connectivity with very little overhead resulting in superb speeds, low latency and excellent reliability.
So what’s the problem? Aside from the obvious benefits, wireguard traffic is easily identifiable. Most firewalls of all sizes can easily identify wireguard traffic through a simple packet header match. VPN blocking can be a real problem in countries where basic civil rights and freedom of expression are suppressed and access to global digital content is prohibited.
In order to circumvent wireguard VPN traffic it must be wrapped in a TCP tunnel or “obfuscated” using techniques in obfsproxy or shadowsocks. In this article we will explain two ways in which you can obfuscate wireguard traffic to StarVPN servers.
Option 1 – Windows Wireguard App
Step1 – Register an account with StarVPN
Head on over to our pricing plan options and choose a VPN plan that suits your needs. You can register on checkout or directly here.
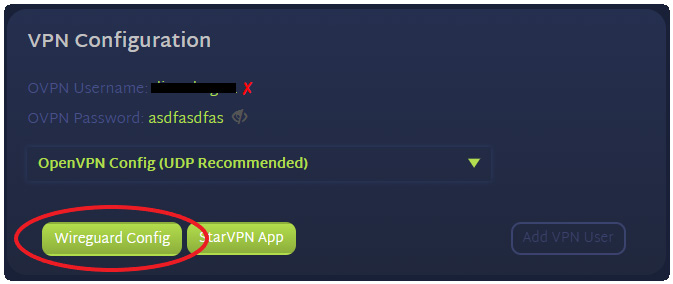
Step 2 – Download Wireguard Configuration
Log into the StarVPN member area dashboard. Click on Wireguard Config to download the configuration file. Each slot will contain a unique wireguard configuration file.
Step 3 – Download the Windows Installer from the Wireguard Website
Download and install the latest Wireguard Windows installation package from the Wireguard Website here Proceed with the installation instructions to complete the Wireguard Installation on Windows Desktop.
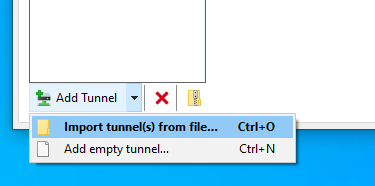
Step 4 – Input Configuration
Start up the Wireguard client, select “Add Tunnel” -> “Import Tunnel from File“. Select the configuration file downloaded in Step 2.
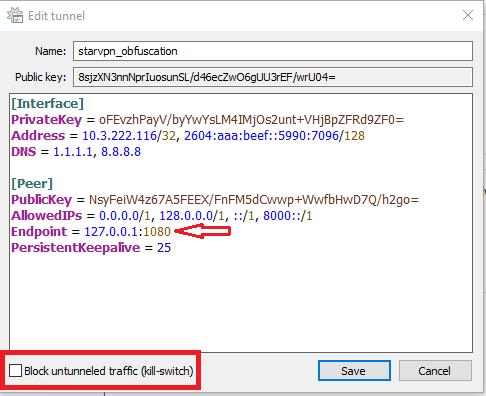
Step 5 – Additional Configuration
Select the newly added tunnel and click the “Edit” button. From here, you can choose to enable or disable the Kill Switch option or edit your tunnel by copying and pasting the configuration directly in this window. For example, if you’d like to connect to slot 2 or 3, simply copy and paste the configuration in separate tunnel profiles.
Next, modify the Endpoint and change wg.starzone.io:1276 to 127.0.0.1:1080. We will route traffic to the local shadowsocks listener instead of direct to server.
- Endpoint = 127.0.0.1:1080
- Block untunneled traffic = Disable
Step 6 – Install Shadowsocks
In this step we will need to start the shadowsocks listener to accept incoming TCP connections from Wireguard via a TCP Tunnel mode.
- Create a local directory in C:/shadowsocks
- Download the Windows shadowsocks sslocal.exe executable here. It can also be found on github here.
- Download the shadowsocks configuration file to connect to StarVPN servers here.
- Edit the shadowsocks configuration file and replace the first line with your StarVPN server IP
“server”:”starvpn server IP“To find the closest server IP: Click on Start -> Search -> type "cmd" -> type "ping wg.starzone.io" (in the black screen).
- Place both sslocal.exe and shadowsocks-client-config-wg.json into the C:/shadowsocks directory
- CD to the C:/shadowsocks directory
- Start Shadowsocks by entering the command “sslocal.exe -c shadowsocks-client-config-wg.json”

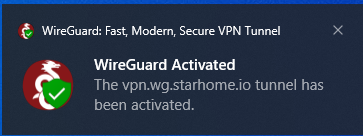
Step 7 – Connect with Wireguard
Click the “Activate” button to be connected to the StarVPN Wireguard VPN via Shadowsocks obfuscation. If the connection is successful, you will see a Tunnel activate message in the system icon tray.
Troubleshooting
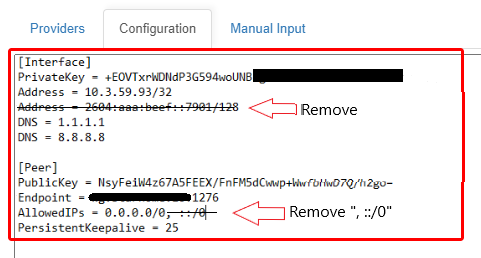
The most common issue with routers or desktops is the inability to support IPv6, if you try connect and receive an IP error or connection issue, remove the IPv6 configuration in the configuration file
Option 2 – StarVPN App for Windows
Option 2 is by far the simpler solution. StarVPN includes a pre-build shadowsocks launcher which can be enabled within seconds in 3 easy steps.
- Download the StarVPN Windows App on our main page here.
- Launch the StarVPN app and navigate to the settings tab
- Enable VPN Obfuscation

That’s it, click connect and you’re all done!