DD-WRT is an open source router software build that can run on a wide range of commercial routers. It offers OpenVPN, L2TP and PPTP protocol support and can be customized and tuned for ultimate flexibility. You can check if your router supports DD-WRT firmware here. Support for DD-WRT installation and how-to guides can be found here.
Step1 – Register an account with StarVPN
Head on over to our pricing plan options and choose a VPN plan that suits your needs. You can register on checkout or directly here.
Step 2 – VPN Login Information
Log into the StarVPN member area dashboard. You can find your VPN username and password for each slot in the Manage Slots Section or dashboard area.
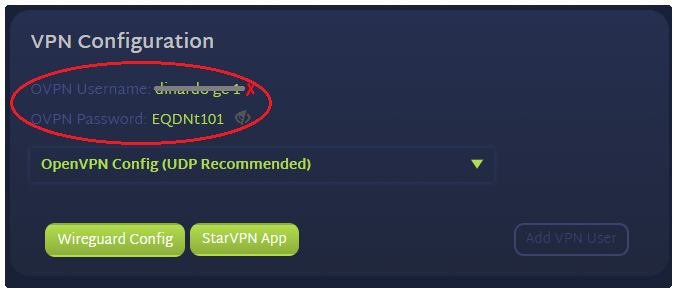
For multiple slots, the VPN configuration settings and credentials can be located in the “Manage Slots” section.

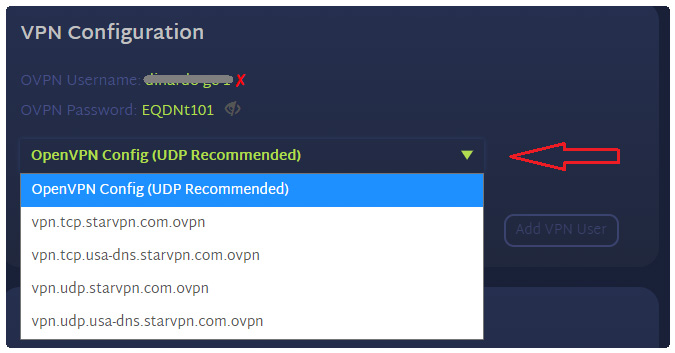
Step 3 – Download OpenVPN Configuration File
The next step, you must download the VPN server configuration files necessary so that the OpenVPN Software knows where to connect to. Download the configuration file in the members area dashboard.
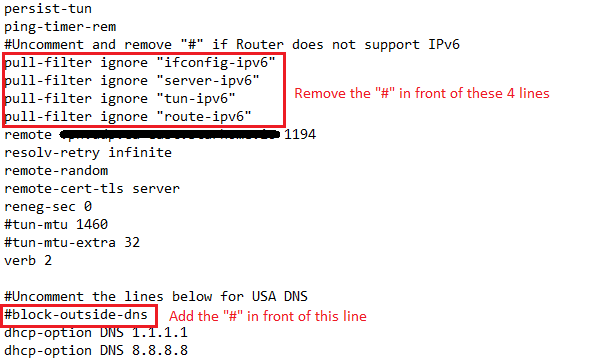
Note: Some routers do not support DNS Leak protection (block-outside-dns in the ovpn configuration file). If you experience connection issues, please edit the ovpn configuration file and remove the line – “block-outside-dns”.
Step 4 – Configure DNS for Route Leak Protection
StarVPN provides DNS leak protection in the ovpn configuration file, this step is optional
Log into your Router Administrative interface. Enter the router IP into into your web browser. This is typically – http://192.168.1.1 or http://192.168.0.1
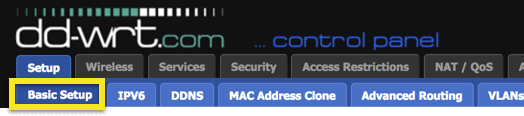
In the DD-WRT Administrative interface, navigate to Setup -> Basic Setup
Under the Section labelled “DHCP” Enter the desired DNS server provider IP’s in fields “Static DNS 1” and “Static DNS 2“. For the purpose of this article you can enter Google DNS 8.8.8.8 and 8.8.4.4.
Select the following check boxes – “Use DNSMasq for DHCP” , “Use DNSMasq for DNS” , “DHCP-Authoritative“
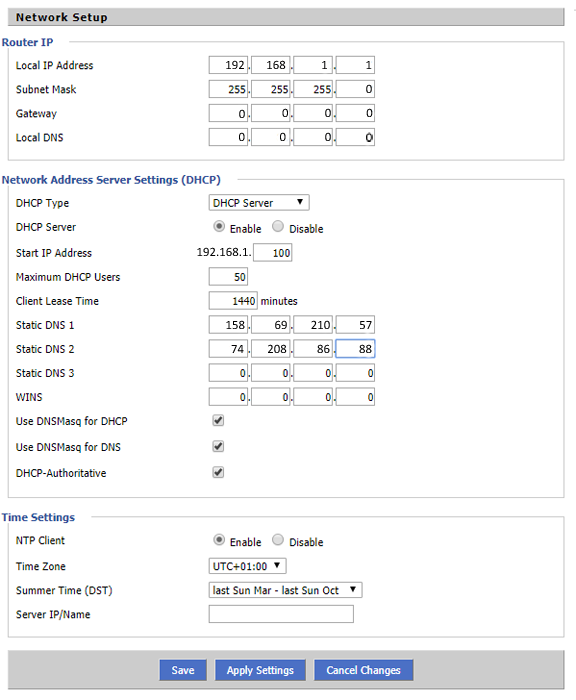
Click “Save” and “Apply Settings” to save your changes.
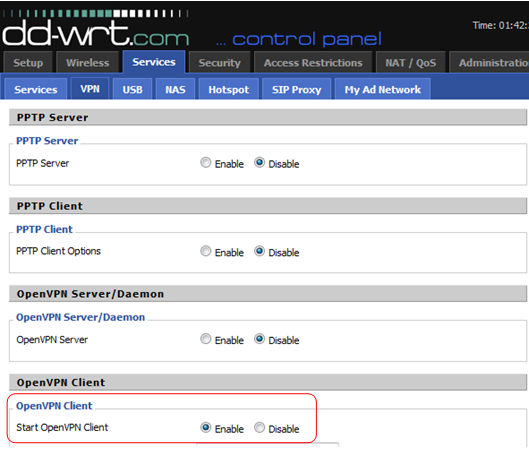
Step 5 – Configure OpenVPN
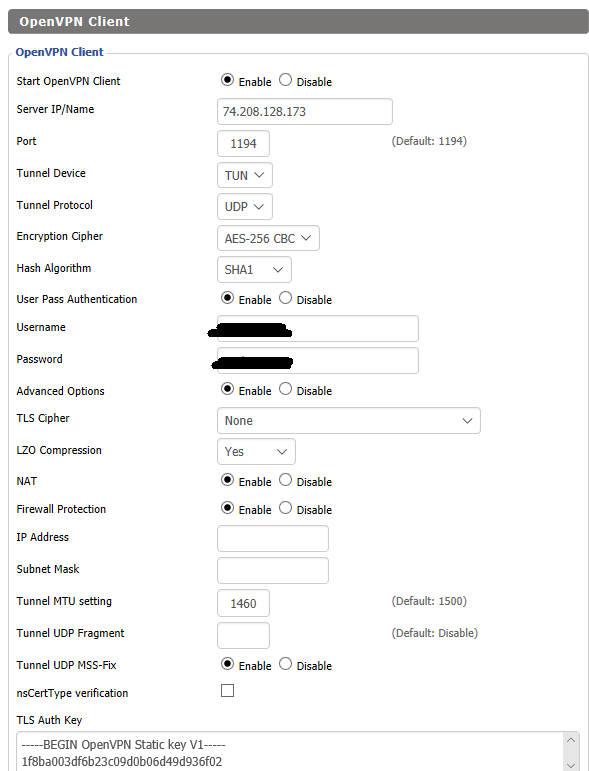
Navigate to Services -> VPN. Under the OpenVPN Client settings and find “Start OpenVPN Client” and select “Enable“
Open the .ovpn file you downloaded in the previous step with a text editor of your choice and use these values to fill out the fields.
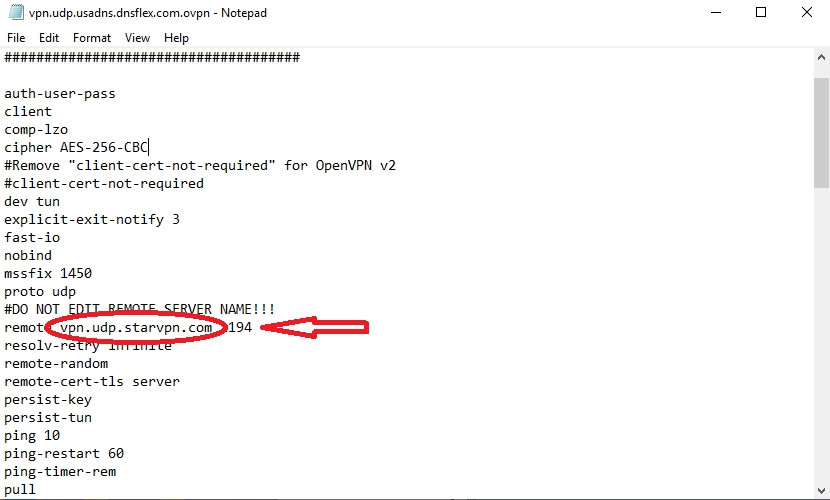
Server IP/Name = vpn.udp.starzone.io
Port = 1194
Tunnel Device = TUN
Tunnel Protocol = UDP
Encryption Cipher = AES-256-CBC
Hash Algorithm = SHA1
User Pass Authentication = Enable
Username = StarVPN VPN Username
Password = StarVPN VPN Password
Advanced Options = Enable (this will enable additional options)
TLS Cipher = None
LZO Compression = no
NAT = Enable
Note: If the options are not mentioned in this guide, it is assumed to use the default values provided by DD-WRT.
Note: If you are running an older version of DD-WRT firmware, the username and password fields may not appear. Navigate to Administration -> Commands. Enter this code and replace “Username/Password” with your StarVPN VPN Username and Password.
echo “USERNAME PASSWORD” > /tmp/openvpncl/user.conf
/usr/bin/killall openvpn
/usr/sbin/openvpn –config /tmp/openvpncl/openvpn.conf –route-up /tmp/openvpncl/route-up.sh –down-pre /tmp/openvpncl/route-down.sh –daemon
In the “Additional Config” box, enter the following commands:
remote-random
nobind
tun-mtu 1500
tun-mtu-extra 32
mssfix 1450
persist-key
persist-tun
ping-timer-rem
reneg-sec 0
#Delete “#” in the line below if your router does not have credentials fields as such in the previous step:
#auth-user-pass /tmp/openvpncl/user.conf
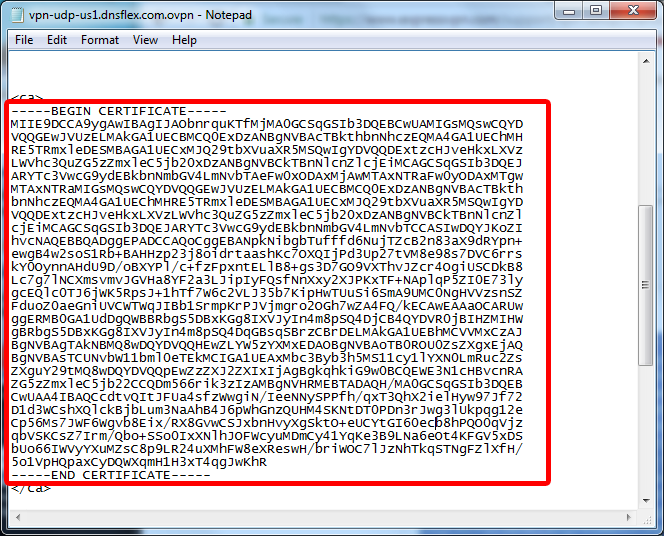
Using your favorite text editor, open the StarVPN .ovpn configuration file you downloaded earlier in this tutorial. Copy the contents of the CA Certificate and paste it in the box named “Ca Cert“. Ensure all parts are copied including “—–BEGIN CERTIFICATE—– and —–END CERTIFICATE—–” lines
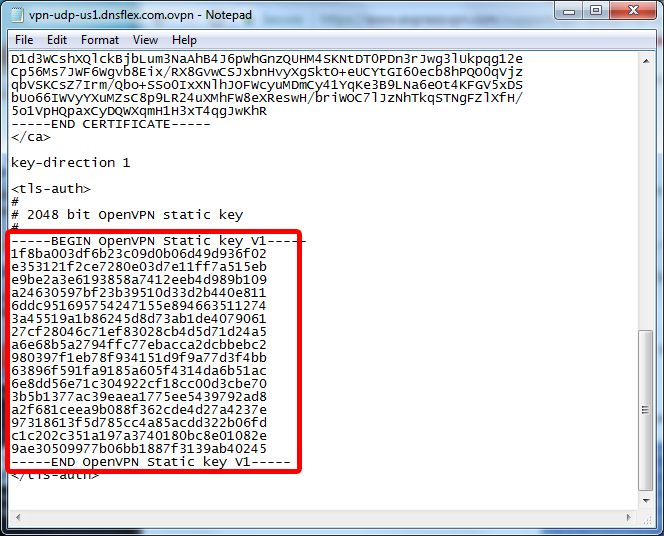
Once more, open the StarVPN .ovpn configuration file. Copy the contents of the TLS Key and paste it in the box named “TLS Auth Key“. Ensure all contents of the key are copied including – “—–BEGIN OpenVPN Static key V1—–” and “—–END OpenVPN Static key V1—–” lines.
Once all the data is entered, click on “Save” and “Apply“. Your settings should look like this:
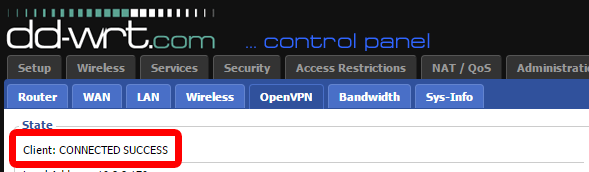
To verify your router is connected to the VPN server, navigate to Status -> OpenVPN. You should see a status message -“CONNECTED SUCCESS”.
Once you are connected, login to the StarVPN dashbard to configure your IP Type, Geo-location and ISP. No additional configuration files are required.
Troubleshooting
Some DD-WRT routers do not support IPv6 or DNS Leak Protection, as a result you may experience an IP or connection error. Edit the ovpn configuration file and disable IPv6 by performing these simple tasks.